There are two step required for implementing Green Dao ORM library in to android project
1. Create generator java module
2. Implement data base interaction in Activity
The generator module contains a single class containing the data model definition. This will automatically generate model class and Dao calss for the database interaction
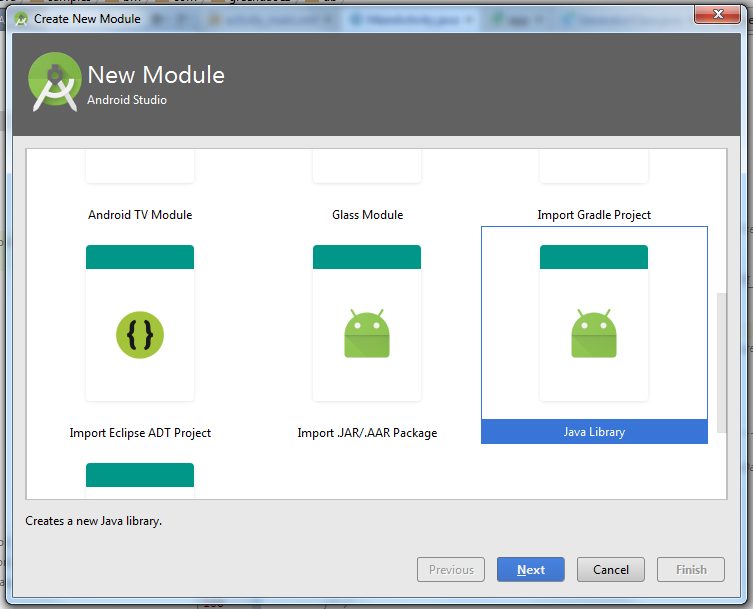
In android studio got File->New-> New Module select Java Library
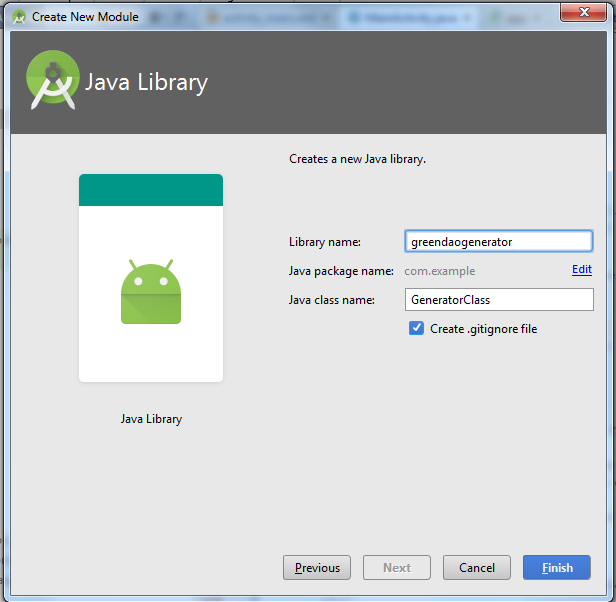
Give library name and class name
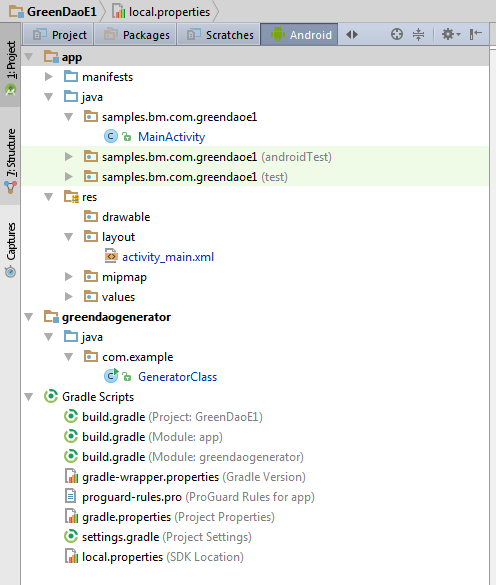
After adding the library the folder structure will be like this
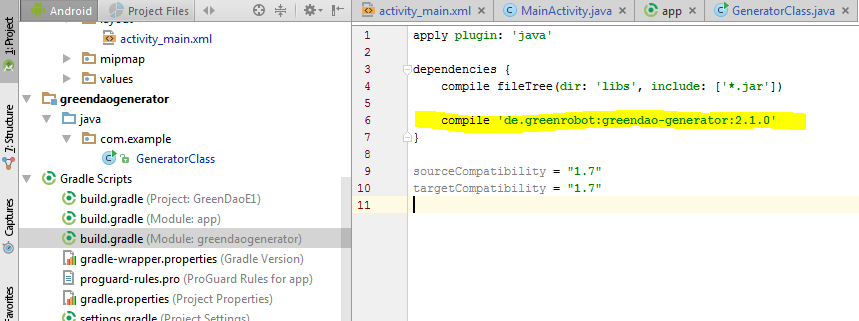
add GreenDao dependency in the created module, and sync
compile 'de.greenrobot:greendao-generator:2.1.0'
for Green dao 3.x please use the plugin
compile 'org.greenrobot:greendao-generator:3.1.0'
Add the following code in GeneratorClass.java file. Here we defining a users table scema
import de.greenrobot.daogenerator.DaoGenerator;
import de.greenrobot.daogenerator.Entity;
import de.greenrobot.daogenerator.Schema;

public class GeneratorClass {

    public static void main(String[] args)  throws Exception {

        //place where db folder will be created inside the project folder
        Schema schema = new Schema(1,"samples.bm.com.greendaoe1.db");

        //Entity Users or table Users
        Entity user= schema.addEntity("Users");
        user.addIdProperty();                       //It is the primary key for uniquely identifying a row
        user.addStringProperty("name").notNull();    //Not null is SQL constrain
        user.addStringProperty("email");
        user.addStringProperty("password");
        //user.addDateProperty("date");

        //  ./app/src/main/java/   ----   com/codekrypt/greendao/db is the full path
        new DaoGenerator().generateAll(schema, "./app/src/main/java");
    }
}
for Green dao 3.x:- just change the imports
import org.greenrobot.greendao.generator.DaoGenerator;
import org.greenrobot.greendao.generator.Entity;
import org.greenrobot.greendao.generator.Schema;
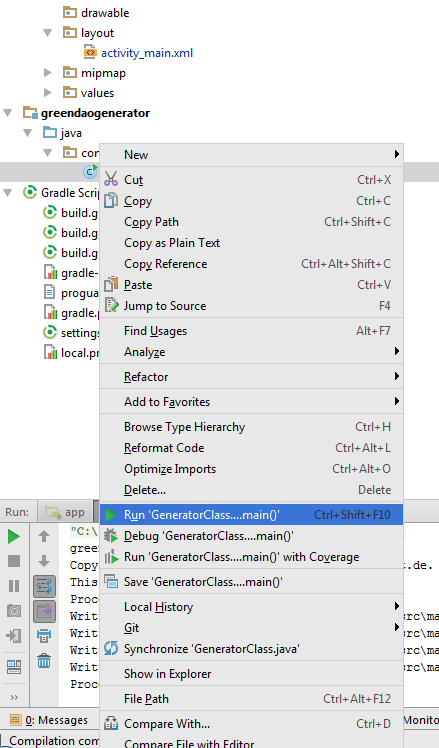
Run GeneratorClass.java file
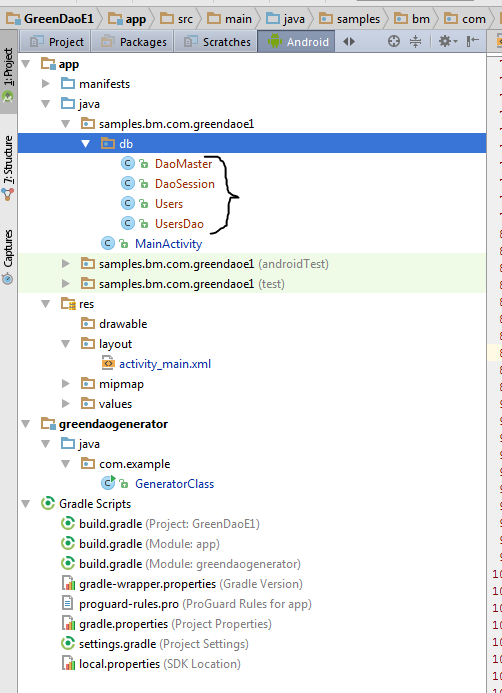
It will Create a db folder inside out main app package
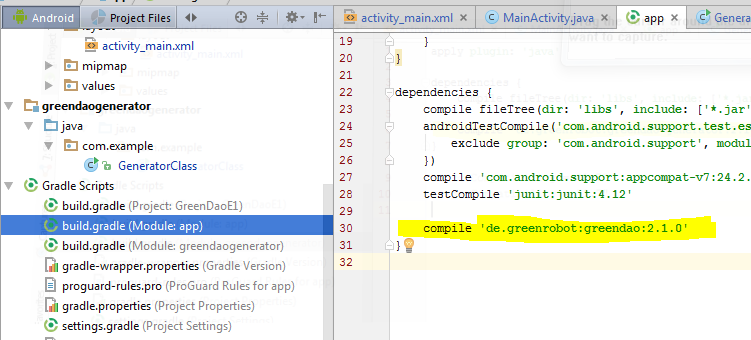
Add Green Dao gradle dependency in our main project and sync
compile 'de.greenrobot:greendao:2.1.0'
for Green dao 3.x:-
compile 'org.greenrobot:greendao:3.1.1'
MainActivity .java
import android.database.sqlite.SQLiteDatabase;
import android.os.Bundle;
import android.support.v7.app.AppCompatActivity;
import android.view.View;
import android.widget.ArrayAdapter;
import android.widget.BaseAdapter;
import android.widget.Button;
import android.widget.EditText;
import android.widget.ListView;

import java.util.ArrayList;
import java.util.List;

import samples.bm.com.greendaoe1.db.DaoMaster;
import samples.bm.com.greendaoe1.db.DaoSession;
import samples.bm.com.greendaoe1.db.Users;
import samples.bm.com.greendaoe1.db.UsersDao;


public class MainActivity extends AppCompatActivity {

    //Dao --> Data Access Object
    private UsersDao userDao; // Sql access object

    private final String DB_NAME = "my-app-db";  //Name of Db file in the Device

    EditText mEtName;
    EditText mEtEmail;
    EditText mEtPassword;

    ArrayAdapter<String> mAdapter;
    ListView mListView;

    List<String> mResult = new ArrayList<>();

    @Override
    protected void onCreate(Bundle savedInstanceState) {
        super.onCreate(savedInstanceState);
        setContentView(R.layout.activity_main);

        //Initialise DAO
        userDao = setupDb();

        //Setting up form elements
        Button btnSave = (Button) findViewById(R.id.btn_Save);

        mEtName = (EditText) findViewById(R.id.et_name);
        mEtEmail = (EditText) findViewById(R.id.et_email);
        mEtPassword = (EditText) findViewById(R.id.et_password);

        mListView = (ListView) findViewById(R.id.lv_result);

        mAdapter = new ArrayAdapter<String>(this, android.R.layout.simple_list_item_1, android.R.id.text1, mResult);
        mListView.setAdapter(mAdapter);

        btnSave.setOnClickListener(new View.OnClickListener() {
            @Override
            public void onClick(View v) {

                String name = mEtName.getText().toString();
                String email = mEtEmail.getText().toString();
                String password = mEtPassword.getText().toString();

                Users user = new Users(null, name, email, password);// Class Object, Id is auto increment

                SaveToSQL(user);

                generateResult();

                mEtName.setText("");
                mEtEmail.setText("");
                mEtPassword.setText("");
            }
        });

        generateResult();
    }

    private void generateResult() {
        List<Users> usersList = getFromSQL();
        int size = usersList.size();

        if (size > 0) {
            mResult.clear();

            for (int i = 0; i < size; i++) {
                Users currentItem = usersList.get(i);
                mResult.add (0,currentItem.getId() + ", " + currentItem.getName() + ", " + currentItem.getEmail() + ", " + currentItem.getPassword());
            }

            ((BaseAdapter) mListView.getAdapter()).notifyDataSetChanged();
        }
    }


    //---------------------------------SQL QUERY Functions-----------------------------------------//
    public List<Users> getFromSQL() {
        List<Users> userses = userDao.queryBuilder().orderDesc(UsersDao.Properties.Id).build().list();
        return userses;
    }

    public void SaveToSQL(Users user) {
        userDao.insert(user);
    }
    //----------------------------***END SQL QUERY***---------------------------------------------//


    //-------------------------------DB Setup Functions---------------------------------------------//

    //Return the Configured LogDao Object
    public UsersDao setupDb() {
        DaoMaster.DevOpenHelper masterHelper = new DaoMaster.DevOpenHelper(this, DB_NAME, null); //create database db file if not exist
        SQLiteDatabase db = masterHelper.getWritableDatabase();  //get the created database db file
        DaoMaster master = new DaoMaster(db);//create masterDao
        DaoSession masterSession = master.newSession(); //Creates Session session
        return masterSession.getUsersDao();
    }
    //-------------------------***END DB setup Functions***---------------------------------------//

}
activity_main.xml
<?xml version="1.0" encoding="utf-8"?>
<LinearLayout xmlns:android="http://schemas.android.com/apk/res/android"
    xmlns:tools="http://schemas.android.com/tools"
    android:id="@+id/activity_main"
    android:layout_width="match_parent"
    android:layout_height="match_parent"
    android:orientation="vertical"
    android:paddingBottom="@dimen/activity_vertical_margin"
    android:paddingLeft="@dimen/activity_horizontal_margin"
    android:paddingRight="@dimen/activity_horizontal_margin"
    android:paddingTop="@dimen/activity_vertical_margin"
    tools:context="samples.bm.com.greendaoe1.MainActivity">


    <EditText
        android:id="@+id/et_name"
        android:layout_width="match_parent"
        android:layout_height="wrap_content"
        android:hint="Name" />

    <EditText
        android:id="@+id/et_email"
        android:layout_width="match_parent"
        android:layout_height="wrap_content"
        android:hint="Email" />

    <EditText
        android:id="@+id/et_password"
        android:layout_width="match_parent"
        android:layout_height="wrap_content"
        android:hint="Password" />

    <Button
        android:id="@+id/btn_Save"
        android:layout_width="match_parent"
        android:layout_height="wrap_content"
        android:text="Save" />

    <TextView
        android:layout_width="match_parent"
        android:layout_height="wrap_content"
        android:layout_marginBottom="10dp"

        android:layout_marginTop="20dp"
        android:text="Result"
        android:textStyle="bold" />

    <ListView
        android:id="@+id/lv_result"
        android:layout_width="match_parent"
        android:layout_height="wrap_content" />

</LinearLayout>
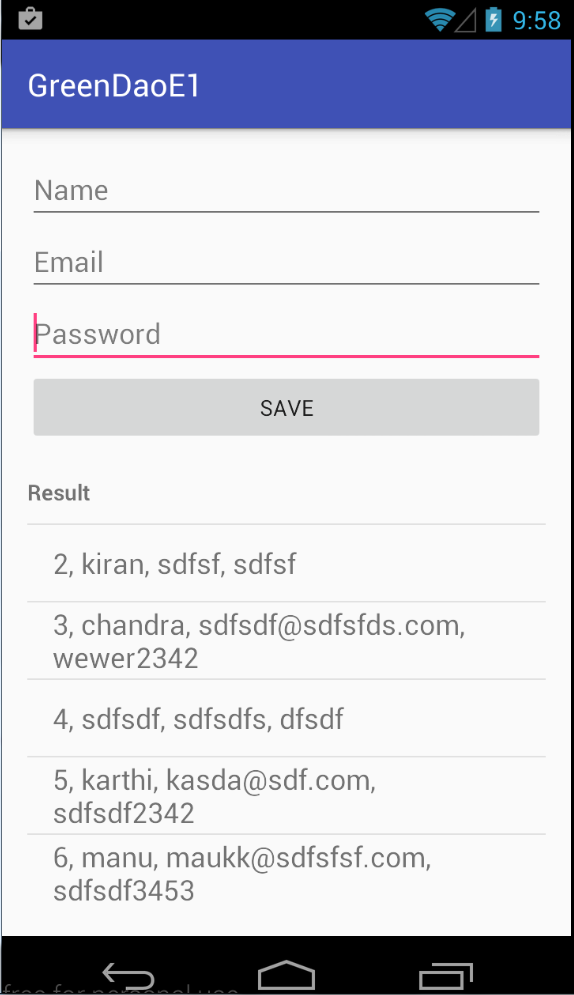
Out Put
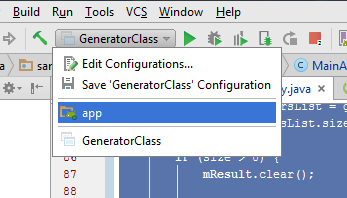
Note:-
While running you app you need to set app from tine toolbar and run
Ref:
(For using multiple layout in RecyclerView check this tutorial )
Add ‘com.android.support:recyclerview‘ in Gradle dependencies and sync it
my app/build.gradle file
apply plugin: 'com.android.application'

android {
    compileSdkVersion 24
    buildToolsVersion "24.0.1"

    defaultConfig {
        applicationId "samples.bm.com.myapplication"
        minSdkVersion 14
        targetSdkVersion 24
        versionCode 1
        versionName "1.0"
    }
    buildTypes {
        release {
            minifyEnabled false
            proguardFiles getDefaultProguardFile('proguard-android.txt'), 'proguard-rules.pro'
        }
    }
}

dependencies {
    compile fileTree(dir: 'libs', include: ['*.jar'])
    testCompile 'junit:junit:4.12'
    compile 'com.android.support:appcompat-v7:24.2.0'

    compile 'com.android.support:recyclerview-v7:24.2.0'
}
MainActivity
package samples.bm.com.myapplication;

import android.os.Bundle;
import android.support.v7.app.AppCompatActivity;
import android.support.v7.widget.LinearLayoutManager;
import android.support.v7.widget.RecyclerView;
import android.widget.Toast;
import java.util.ArrayList;

public class MainActivity extends AppCompatActivity implements MyMediatorInterface {

    private MyAdapter mAdapter;
    private ArrayList<UserModel> usersList;

    @Override
    protected void onCreate(Bundle savedInstanceState) {
        super.onCreate(savedInstanceState);
        setContentView(R.layout.activity_main);

        usersList = new ArrayList<>();

        usersList.add(new UserModel("Jos", "123546567"));
        usersList.add(new UserModel("Kiran", "456546456"));
        usersList.add(new UserModel("Manu", "5678"));
        usersList.add(new UserModel("Roy", "67443453"));
        usersList.add(new UserModel("Musthu", "456353"));
        usersList.add(new UserModel("Jaffer", "4644"));

        RecyclerView recyclerView = (RecyclerView) findViewById(R.id.rv_my_recycler_view);
        recyclerView.setHasFixedSize(true);

        LinearLayoutManager layoutManager = new LinearLayoutManager(this);
        recyclerView.setLayoutManager(layoutManager);

        mAdapter = new MyAdapter(usersList, this);
        recyclerView.setAdapter(mAdapter);

    }

    @Override
    public void userItemClick(int pos) {
        Toast.makeText(MainActivity.this, "Clicked User : " + usersList.get(pos).name, Toast.LENGTH_SHORT).show();
    }
}
Model
package samples.bm.com.myapplication;

public class UserModel {
    public String name;
    public String phone;

    public UserModel(String name, String phone) {
        this.name = name;
        this.phone = phone;
    }
}
Adapter
package samples.bm.com.myapplication;

import android.content.Context;
import android.support.v7.widget.RecyclerView;
import android.view.LayoutInflater;
import android.view.View;
import android.view.ViewGroup;
import android.widget.LinearLayout;
import android.widget.TextView;
import java.lang.ref.WeakReference;
import java.util.ArrayList;


public class MyAdapter extends RecyclerView.Adapter<MyAdapter.MyViewHolder> {

    ArrayList<UserModel> mUsersList;
    WeakReference<Context> mContextWeakReference;

    public MyAdapter(ArrayList<UserModel> usersList, Context context) {
        mUsersList = usersList;
        this.mContextWeakReference = new WeakReference<Context>(context);
    }

    @Override
    public MyViewHolder onCreateViewHolder(ViewGroup parent, int viewType) {

        Context context = mContextWeakReference.get();

        if (context != null) {

            View itemView = LayoutInflater.from(parent.getContext()).inflate(R.layout.row_user_item, parent, false);

            return new MyViewHolder(itemView, context);
        }

        return null;
    }

    @Override
    public void onBindViewHolder(final MyViewHolder holder, int position) {

        Context context = mContextWeakReference.get();

        if (context == null) {
            return;
        }

        UserModel currentUser = mUsersList.get(position);

        holder.TvName.setText(currentUser.name);
        holder.TvPhone.setText(currentUser.phone);

    }

    @Override
    public int getItemCount() {
        return mUsersList.size();
    }

    //holder
    public static class MyViewHolder extends RecyclerView.ViewHolder {

        public TextView TvName, TvPhone;
        public LinearLayout ll;

        public MyViewHolder(View itemView, final Context context) {

            super(itemView);
            TvName = (TextView) itemView.findViewById(R.id.tv_name);
            TvPhone = (TextView) itemView.findViewById(R.id.tv_phone);
            ll = (LinearLayout) itemView.findViewById(R.id.ll_layout);

            ll.setOnClickListener(new View.OnClickListener() {

                @Override
                public void onClick(View view) {
                    ((MainActivity) context).userItemClick(getAdapterPosition());
                }
            });
        }
    }
}
Interface:
package samples.bm.com.myapplication;

public interface MyMediatorInterface {
    void userItemClick(int pos);
}
Layouts
<?xml version="1.0" encoding="utf-8"?>
<LinearLayout xmlns:android="http://schemas.android.com/apk/res/android"
    xmlns:tools="http://schemas.android.com/tools"
    android:layout_width="match_parent"
    android:layout_height="match_parent"
    android:paddingBottom="@dimen/activity_vertical_margin"
    android:paddingLeft="@dimen/activity_horizontal_margin"
    android:paddingRight="@dimen/activity_horizontal_margin"
    android:paddingTop="@dimen/activity_vertical_margin"
    tools:context="samples.bm.com.myapplication.MainActivity"
    android:orientation="vertical">

    <TextView
        android:layout_width="wrap_content"
        android:layout_height="wrap_content"
        android:text="Hello World!" />

    <android.support.v7.widget.RecyclerView
        android:id="@+id/rv_my_recycler_view"
        android:layout_width="match_parent"
        android:layout_height="wrap_content" />

</LinearLayout>
Recycler View row
<?xml version="1.0" encoding="utf-8"?>
<LinearLayout
    android:id="@+id/ll_layout"
    xmlns:android="http://schemas.android.com/apk/res/android"
    android:layout_width="match_parent"
    android:layout_height="wrap_content"
    android:padding="20px">

    <TextView
        android:id="@+id/tv_name"
        android:layout_width="0dp"
        android:layout_weight="1"
        android:layout_height="wrap_content" />

    <TextView
        android:id="@+id/tv_phone"
        android:layout_width="wrap_content"
        android:layout_height="wrap_content"
        android:gravity="right" />
</LinearLayout>
Out Put
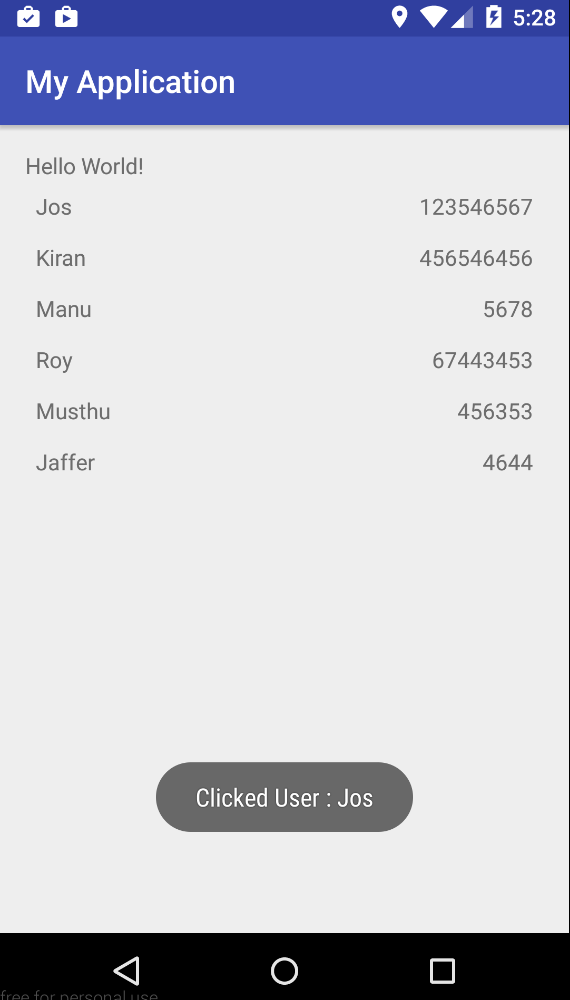
If you want to add data to RecyclerView add data into the Array List (eg:- usersList.add(new UserModel(“new name”, “345”)); and you can call the adapter function notifyItemInserted() or notifyDatasetChanged().
mAdapter.notifyItemInserted(position);
mAdapter.notifyDataSetChanged(); //this function you can call with any activity (inset,update,delete) but it is expensive
While editing edit the value in array list and call notifyItemChanged(position), while deleting delete the position from array list and call notifyItemRemoved(position)
Create a new with nodejs and express (check this post for how to create node express project)
Pr-requirements
index.js this is my app entry point.
var express = require('express');
var app = express();

app.use(express.static('public'));

//Routes
app.use(require('./routes'));

//app.use("/user",require('./routes'));  //http://127.0.0.1:8000/user  http://127.0.0.1:8000/user/about


var server = app.listen(8000, function () {

    var host = server.address().address
    var port = server.address().port

    console.log("Server started.. (listening at http://%s:%s)", host, port)

})
routes.js :- I have made a separate rout file that’s why the routs.js file (Check this post for how to make separate rout file) otherwise you can directly add this code into your entry point file (in my case index.js)
I am using the multer node package for handing multipart request
var express = require('express');
var router = express.Router();


var bodyParser = require('body-parser');
// Create application/x-www-form-urlencoded parser
var urlencodedParser = bodyParser.urlencoded({ extended: false })

var multer = require('multer')
var upload = multer({ dest: './uploads/' });

//middle ware that is specific to this router
router.use(function timeLog(req, res, next) {
    //console.log('Time: ', Date.now());
    next();
});

//Home page
router.get('/', function (req, res) {
    res.sendFile(__dirname + "/" + "home.htm");
})

//processing GET request
router.get('/process_get', function (req, res) {

    // Prepare output in JSON format
    response = {
        first_name: req.query.first_name,
        last_name: req.query.last_name,
        message: 'Result from a GET request'
    };
    console.log(response);
    res.end(JSON.stringify(response));
})

//processing POST Request
router.post('/process_post', urlencodedParser, function (req, res) {

    // Prepare output in JSON format
    response = {
        first_name: req.body.first_name,
        last_name: req.body.last_name,
        message: 'Result from a POST request'
    };
    console.log(response);
    res.end(JSON.stringify(response));
})

//Multipart request (Accept one file where the name of the form field is named photo)
router.post('/file_upload', upload.single('photo'), function (req, res) {

    console.log(req.body) // form fields

    //console.log(req.body.first_name)
    //console.log(req.body.last_name)

    console.log(req.file) // form files
    res.status(204).end()
});

module.exports = router;
home.html
<html>
    <body>

        <div style="width:400px;">
            <h3>Submit form using GET request</h3>
            <form action="process_get" method="GET">
                First Name: <input type="text" name="first_name">  <br />
                Last Name:  <input type="text" name="last_name">   <br />
                <input type="submit" value="Submit">
            </form>

            <hr />

            <h3>Submit form using POST request</h3>
            <form action="process_post" method="POST" >
                First Name: <input type="text" name="first_name"> <br />
                Last Name:  <input type="text" name="last_name">  <br />
                <input type="submit" value="Submit">
            </form>

            <hr />

            <h3>File Upload:</h3>
            Select a file to upload: <br />
            <form action="file_upload" method="POST"  enctype="multipart/form-data">
                First Name: <input type="text" name="first_name">  <br />
                Last Name:  <input type="text" name="last_name">   <br />
                Photo :     <input type="file" name="photo" size="50" /> <br /><br />
                <input type="submit" value="Submit" />
            </form>

            <hr />
        </div>
    </body>
</html>
package.json
{
    "name": "sample app",
    "version": "0.0.1",
    "description": "express get post multipart tutorial",
    "main": "index.js",
    "scripts": {
        "test": "echo \"Error: no test specified\" && exit 1"
    },
    "author": "bm",
    "license": "ISC",
    "dependencies": {
        "body-parser": "^1.15.2",
        "cookie-parser": "^1.4.3",
        "express": "^4.14.0",
        "multer": "^1.2.0"
    }
}
It is ready open your browser and test it
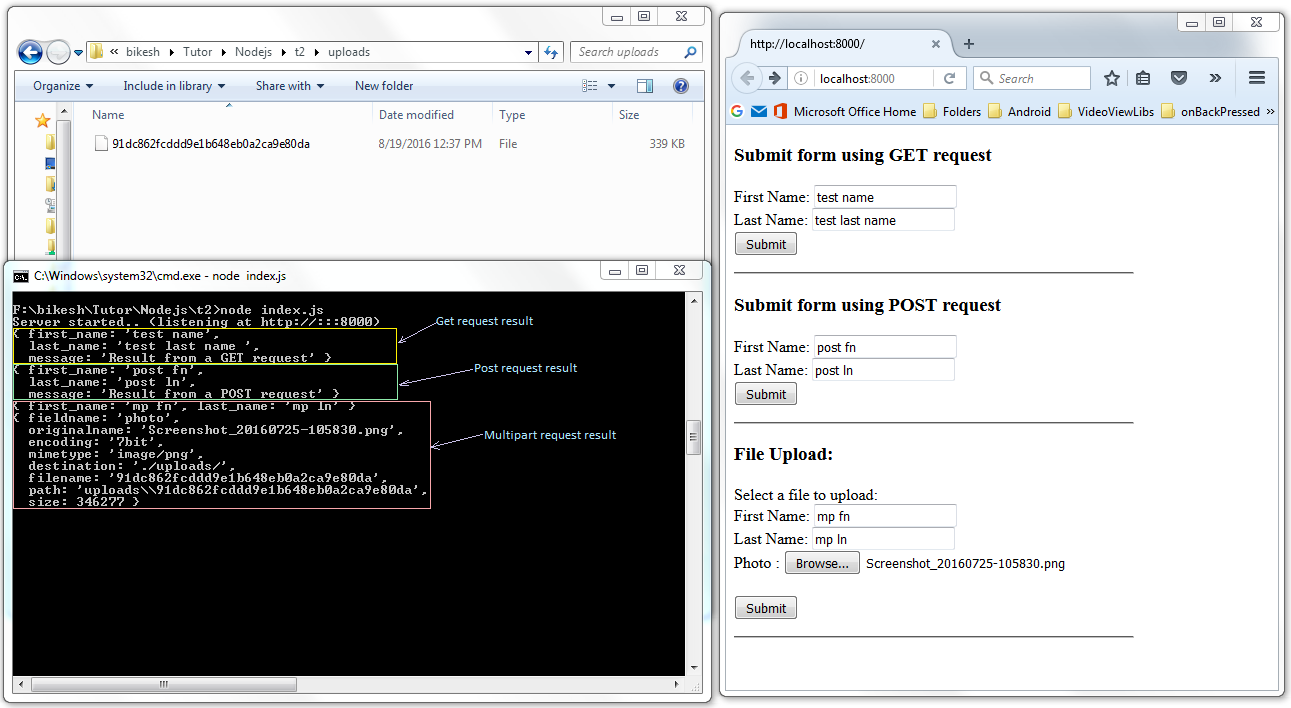
You can see the file is uploaded, but it is using some random name for the file.
For changing file name we can make a small configuration changes in routs.js. Insted of ‘var upload = multer({ dest: ‘./uploads/’ });’ add the new configuration settings
.....
.....

var multer = require('multer')
//var upload = multer({ dest: './uploads/' });

var storage = multer.diskStorage({
    destination: function (request, file, callback) {
        callback(null, './uploads/');
    },
    filename: function (request, file, callback) {
        console.log(file);
        callback(null, file.originalname)
    }
});

var upload = multer({ storage: storage });

.....
.....
ref :
https://wiki.workassis.com/installing-express-with-nodejs/