Option 1
In the AndroidManifest.xml add ‘screenOrientation’ property in activity tag
<activity
    - - - - - - -
    - - - - - - -
    android:screenOrientation="portrait" />
Option 2
In the onCreate function add the following line of code before setContentView() function
    @Override
    protected void onCreate(Bundle savedInstanceState) {
        super.onCreate(savedInstanceState);
        setRequestedOrientation (ActivityInfo.SCREEN_ORIENTATION_PORTRAIT);
        setContentView(R.layout.activity_main);

        //------

    }
Using the express generator tool we can quickly and easy create an application skeleton.
Install express generater
npm install express-generator -g

Use express -h for help
express -h

  Usage: express [options] [dir]

  Options:

    -h, --help          output usage information
    -V, --version       output the version number
    -e, --ejs           add ejs engine support (defaults to jade)
        --hbs           add handlebars engine support
    -H, --hogan         add hogan.js engine support
    -c, --css <engine>  add stylesheet <engine> support (less|stylus|compass|sass) (defaults to plain css)
        --git           add .gitignore
    -f, --force         force on non-empty directory
Creating Express application with express generator
syntax
express <options> <application_name>
eg
express myapp
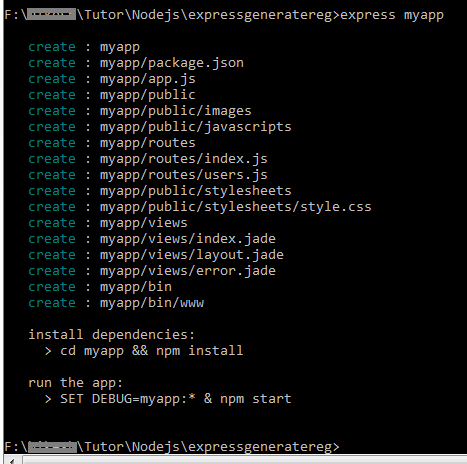
It will create the folder structure and some required files
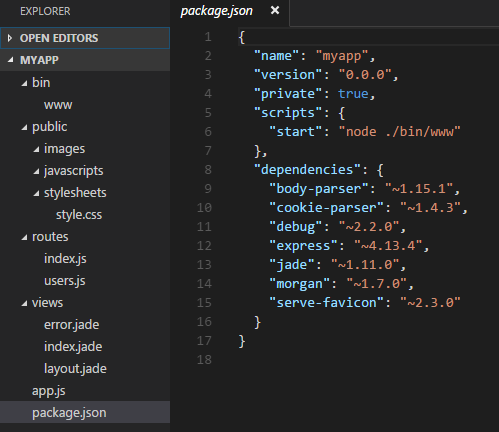
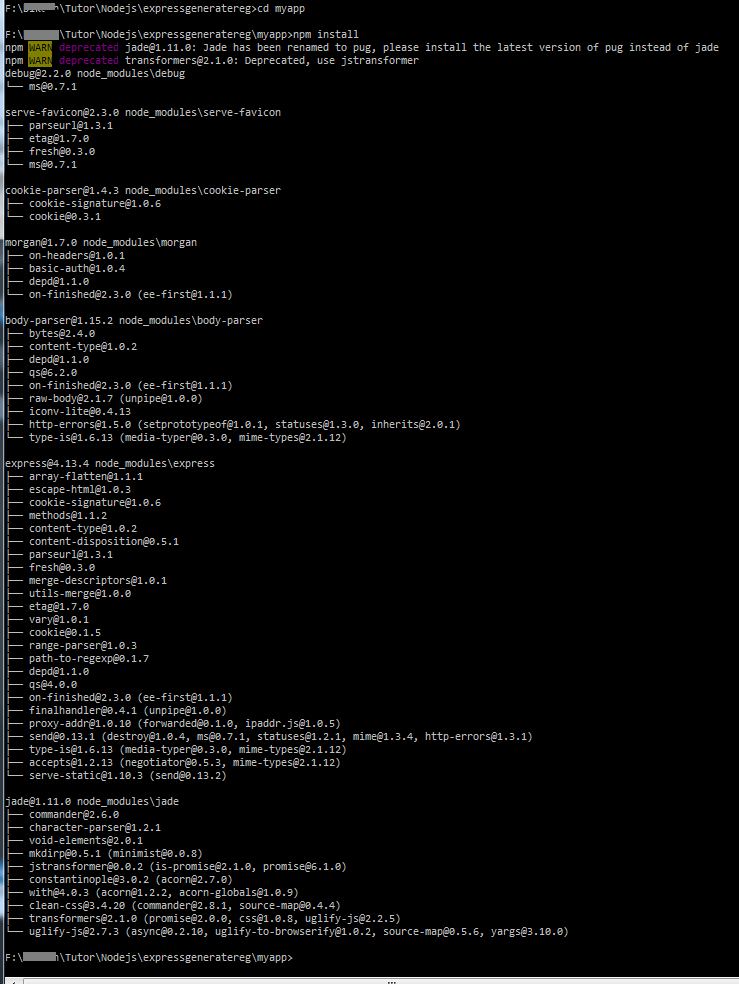
Go inside your app folder and execute npm install
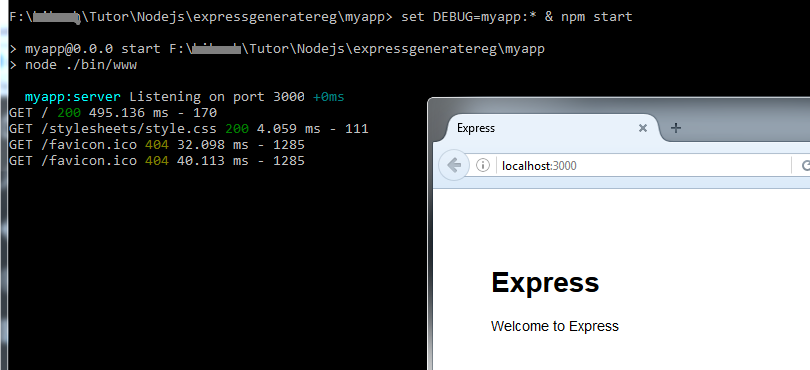
It is ready to start the server
ref : https://expressjs.com/en/starter/generator.html
Add repository
sudo add-apt-repository ppa:webupd8team/java
Update
sudo apt-get update
Install Java
sudo apt-get install oracle-java8-installer
Setting Java environment variables
sudo apt-get install oracle-java8-set-default
chk java version
java -version
Get installation path
which java
Switching between Oracle Java 8 and Java 7
sudo update-java-alternatives -s java-7-oracle
Setting Up JAVA_HOME
Edit /etc/profile (sudo nano /etc/profile ) and add the following
export JAVA_HOME=/usr/lib/jvm/java-8-oracle
save the file and execute
source /etc/profileAndroid Retrofit 2.1 HTTP client :
In this example i have divided in to 5 steps :
1. Add gradle dependency
2. Create models for accessing the final data (in this example, the api response json converting to java object this object class is called model )
3. Create interface to define api end point
4. Create a service class for interacting our java code with retrofit.
5. Make the api calls wherever you required
compile 'com.squareup.retrofit2:retrofit:2.1.0'
compile 'com.squareup.retrofit2:converter-gson:2.1.0'
User.java
public class User {
    public int id;
    public String name;
    public String email;
    public String phone;
}
ApiInterface.java
import java.util.List;

import retrofit2.Call;
import retrofit2.http.Body;
import retrofit2.http.GET;
import retrofit2.http.POST;
import retrofit2.http.Path;
import retrofit2.http.Query;
import samples.bm.com.firebaselogin2.models.User;

public interface ApiInterface {

    @GET("get/users")
    Call<List<User>> getAllUsers(); //List<User> is the response from api

    @GET("get/user")
    Call<User> getUser( @Query("id") int id); //using query param (get/user?id=17479666). User is the response from the api

    //@GET("get/user/{id}")
    //Call<User> getUser( @Query("id") int id); //using path param (get/user/17479666)

    @POST("register/user")
    Call<User> registerUser(@Body User user);

    @FormUrlEncoded
    @POST("update/{id}/user")
    Call<User> updateUser(@Field("name") String name, @Field("phone") String phone, @Path("id") String id);

}
expected api response
get/users
[
    {
	"id": 17479666,
	"name": "name1",
	"email": "name1@domain.com",
	"phone": "3435353535434"
    },
    {
	"id": 17479668,
	"name": "name3",
	"email": "name3@domain.com",
	"phone": "3435353343434"
    }
]
get/user
{
    "id": 17479666,
    "name": "name1",
    "email": "name1@domain.com",
    "phone": "3435353535434"
}
ApiService.java
import com.google.gson.Gson;
import com.google.gson.GsonBuilder;

import retrofit2.Retrofit;
import retrofit2.converter.gson.GsonConverterFactory;

public class ApiService {

    private static ApiInterface service;
    private static String BASE_URL = "https://api.domain.com/"; //your api domain

    public static ApiInterface getInstance() {

        if (service == null) {

            Gson gson = new GsonBuilder()
                    .setDateFormat("yyyy-MM-dd'T'HH:mm:ssZ")
                    .create();

            Retrofit retrofit = new Retrofit.Builder()
                    .baseUrl(BASE_URL)
                    .addConverterFactory(GsonConverterFactory.create(gson))
                    .build();

            service = retrofit.create(ApiInterface.class);
        }

        return service;
    }
}
Retrofit supports synchronous and asynchronous request execution.
Asynchronous Requests
GET calls
ApiService.getInstance().getAllUsers().enqueue(new Callback<List<User>>() {
    @Override
    public void onResponse(Call<List<User>> call, Response<List<User>> response) {
        //api success
        List<User> users = response.body();
    }

    @Override
    public void onFailure(Call<List<User>> call, Throwable t) {
        Log.e("Apicall", t.getMessage());
    }
});
GET call with query string/param OR GET call with path string/param
int id=17479666;
ApiService.getInstance().getUser(id).enqueue(new Callback<User>() {
    @Override
    public void onResponse(Call<User> call, Response<User> response) {
        //api success
        User user = response.body();
    }

    @Override
    public void onFailure(Call<User> call, Throwable t) {
        Log.e("Apicall", t.getMessage());
    }
});
Post call
POST call with body param
User user = new User("samoe", "some@ss.com", "234242424");

ApiService.getInstance().registerUser(user).enqueue(new Callback<User>() {
    @Override
    public void onResponse(Call<User> call, Response<User> response) {
        //api success
        User user = response.body();
    }

    @Override
    public void onFailure(Call<User> call, Throwable t) {
        Log.e("Apicall", t.getMessage());
    }
});
POST call with form encoding
    String name = "some name";
    String phone = "54686868";
    String id="17479666";

    ApiService.getInstance().updateUser(name, phone, id).enqueue(new Callback<User>() {
        @Override
        public void onResponse(Call<User> call, Response<User> response) {
            //api success
            User user = response.body();
        }

        @Override
        public void onFailure(Call<User> call, Throwable t) {
            Log.e("Apicall", t.getMessage());
        }
    });
}
Synchronous request
You can also call the apis synchronously.
try {
     List<User> users = ApiService.getInstance().getAllUsers().execute().body();
} catch (IOException e) {
     e.printStackTrace();
}
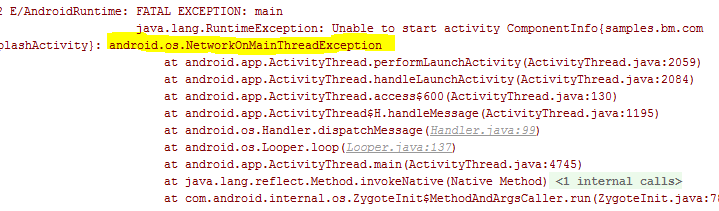
You cannot run this code in main tread you will get exception like ( java.lang.RuntimeException:Unable to start activity ComponentInfo{ …. } android.os.NetworkOnMainThreadException). So better to use synchronous request in services or asyncTask.
How to create AsyncTask : https://wiki.workassis.com/android-asynctask
How to create Service : https://wiki.workassis.com/android-intentservice-example
Androidmanifest.xml
You need to use NoactionBar theme
----
----
<activity android:name=".SplashActivity"
    android:theme="@style/Theme.AppCompat.Light.NoActionBar">

---
----
Activity class (SplashActivity.java)
public class SplashActivity extends AppCompatActivity {

    @Override
    protected void onCreate(Bundle savedInstanceState) {
        requestWindowFeature(Window.FEATURE_NO_TITLE);
        getWindow().setFlags(WindowManager.LayoutParams.FLAG_FULLSCREEN, WindowManager.LayoutParams.FLAG_FULLSCREEN);

        super.onCreate(savedInstanceState);


        setContentView(R.layout.activity_splash);
    }
}
There are two step required for implementing Green Dao ORM library in to android project
1. Create generator java module
2. Implement data base interaction in Activity
The generator module contains a single class containing the data model definition. This will automatically generate model class and Dao calss for the database interaction
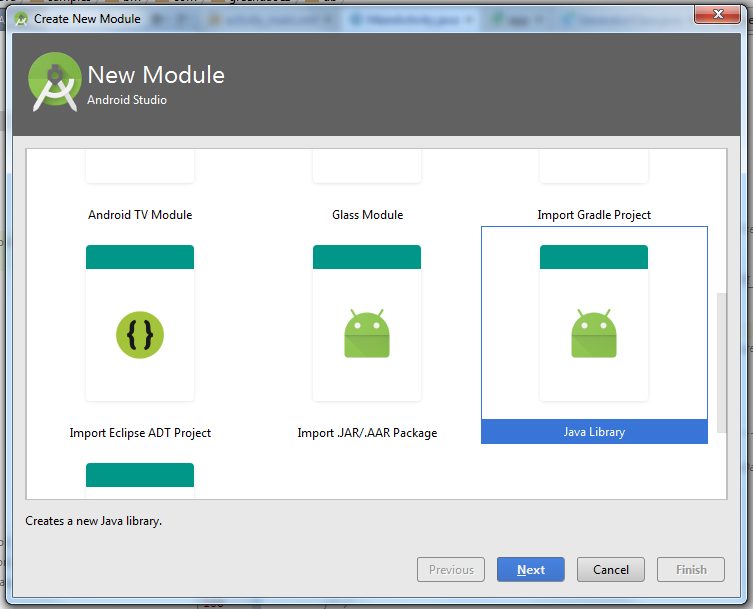
In android studio got File->New-> New Module select Java Library
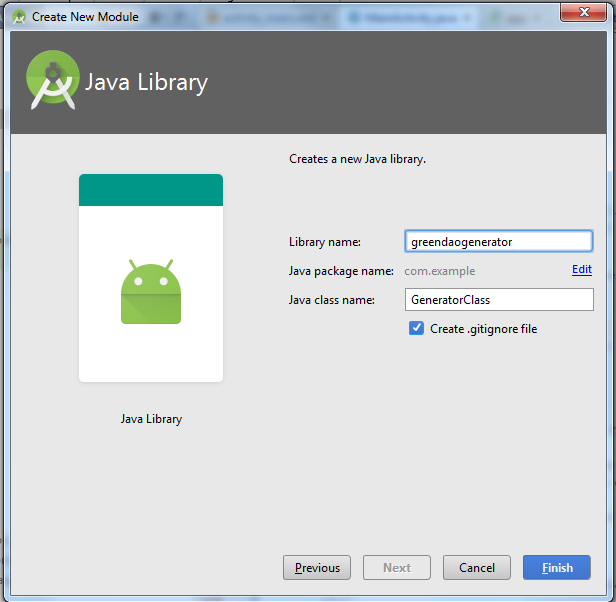
Give library name and class name
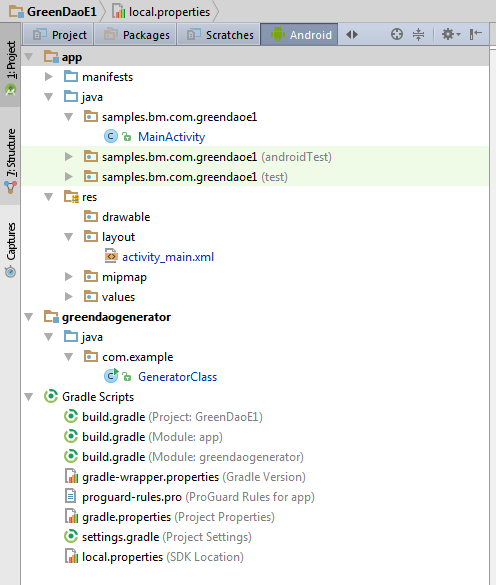
After adding the library the folder structure will be like this
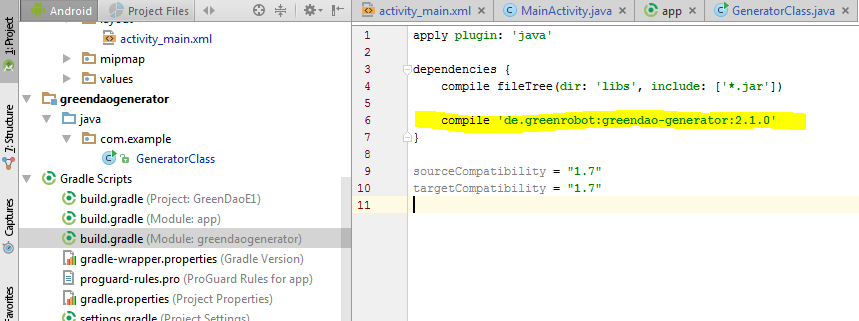
add GreenDao dependency in the created module, and sync
compile 'de.greenrobot:greendao-generator:2.1.0'
for Green dao 3.x please use the plugin
compile 'org.greenrobot:greendao-generator:3.1.0'
Add the following code in GeneratorClass.java file. Here we defining a users table scema
import de.greenrobot.daogenerator.DaoGenerator;
import de.greenrobot.daogenerator.Entity;
import de.greenrobot.daogenerator.Schema;

public class GeneratorClass {

    public static void main(String[] args)  throws Exception {

        //place where db folder will be created inside the project folder
        Schema schema = new Schema(1,"samples.bm.com.greendaoe1.db");

        //Entity Users or table Users
        Entity user= schema.addEntity("Users");
        user.addIdProperty();                       //It is the primary key for uniquely identifying a row
        user.addStringProperty("name").notNull();    //Not null is SQL constrain
        user.addStringProperty("email");
        user.addStringProperty("password");
        //user.addDateProperty("date");

        //  ./app/src/main/java/   ----   com/codekrypt/greendao/db is the full path
        new DaoGenerator().generateAll(schema, "./app/src/main/java");
    }
}
for Green dao 3.x:- just change the imports
import org.greenrobot.greendao.generator.DaoGenerator;
import org.greenrobot.greendao.generator.Entity;
import org.greenrobot.greendao.generator.Schema;
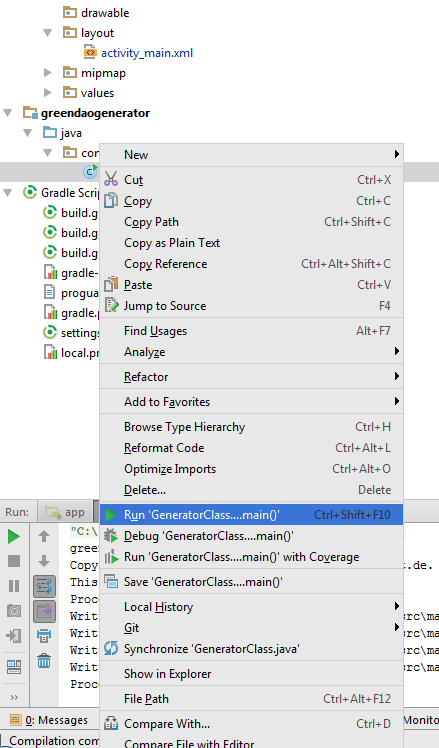
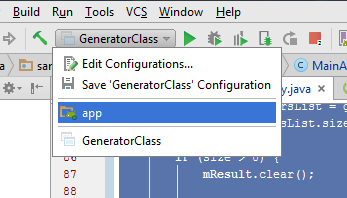
Run GeneratorClass.java file
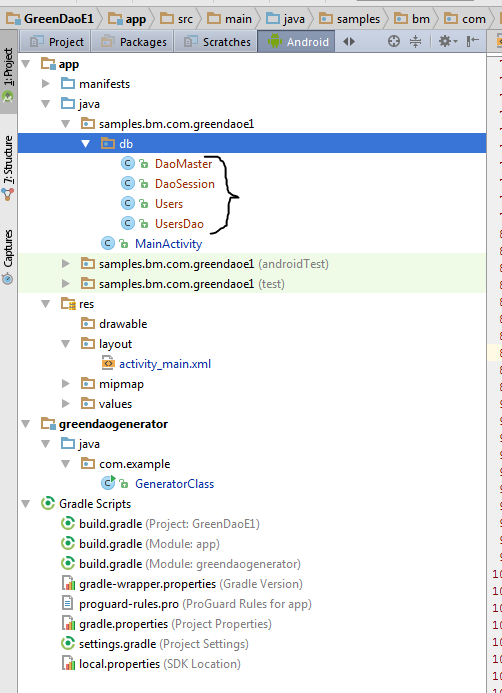
It will Create a db folder inside out main app package
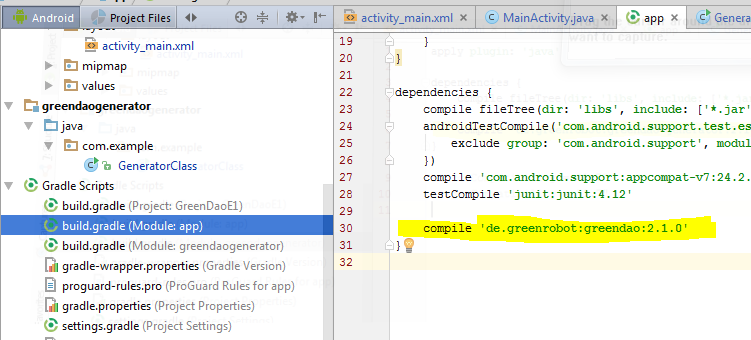
Add Green Dao gradle dependency in our main project and sync
compile 'de.greenrobot:greendao:2.1.0'
for Green dao 3.x:-
compile 'org.greenrobot:greendao:3.1.1'
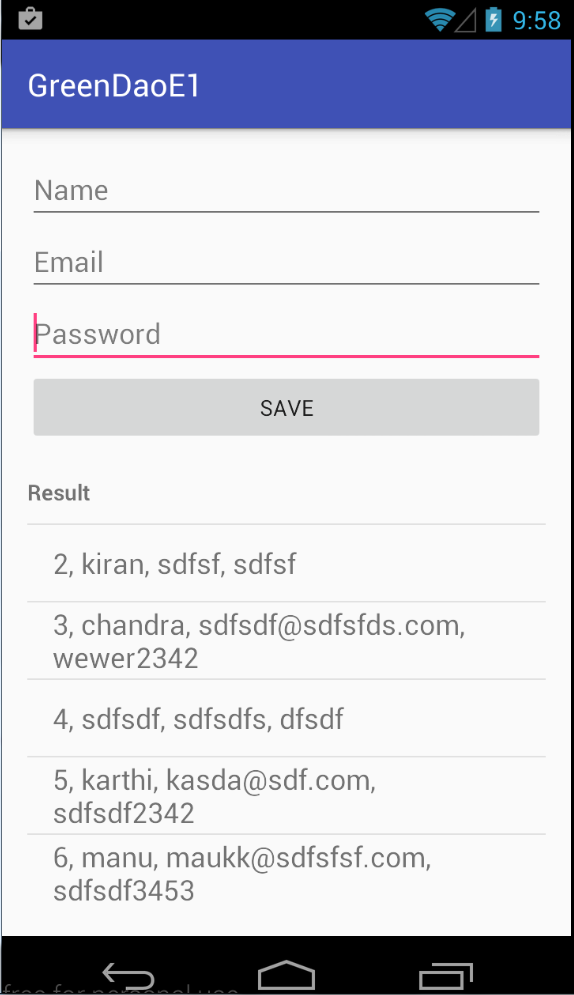
MainActivity .java
import android.database.sqlite.SQLiteDatabase;
import android.os.Bundle;
import android.support.v7.app.AppCompatActivity;
import android.view.View;
import android.widget.ArrayAdapter;
import android.widget.BaseAdapter;
import android.widget.Button;
import android.widget.EditText;
import android.widget.ListView;

import java.util.ArrayList;
import java.util.List;

import samples.bm.com.greendaoe1.db.DaoMaster;
import samples.bm.com.greendaoe1.db.DaoSession;
import samples.bm.com.greendaoe1.db.Users;
import samples.bm.com.greendaoe1.db.UsersDao;


public class MainActivity extends AppCompatActivity {

    //Dao --> Data Access Object
    private UsersDao userDao; // Sql access object

    private final String DB_NAME = "my-app-db";  //Name of Db file in the Device

    EditText mEtName;
    EditText mEtEmail;
    EditText mEtPassword;

    ArrayAdapter<String> mAdapter;
    ListView mListView;

    List<String> mResult = new ArrayList<>();

    @Override
    protected void onCreate(Bundle savedInstanceState) {
        super.onCreate(savedInstanceState);
        setContentView(R.layout.activity_main);

        //Initialise DAO
        userDao = setupDb();

        //Setting up form elements
        Button btnSave = (Button) findViewById(R.id.btn_Save);

        mEtName = (EditText) findViewById(R.id.et_name);
        mEtEmail = (EditText) findViewById(R.id.et_email);
        mEtPassword = (EditText) findViewById(R.id.et_password);

        mListView = (ListView) findViewById(R.id.lv_result);

        mAdapter = new ArrayAdapter<String>(this, android.R.layout.simple_list_item_1, android.R.id.text1, mResult);
        mListView.setAdapter(mAdapter);

        btnSave.setOnClickListener(new View.OnClickListener() {
            @Override
            public void onClick(View v) {

                String name = mEtName.getText().toString();
                String email = mEtEmail.getText().toString();
                String password = mEtPassword.getText().toString();

                Users user = new Users(null, name, email, password);// Class Object, Id is auto increment

                SaveToSQL(user);

                generateResult();

                mEtName.setText("");
                mEtEmail.setText("");
                mEtPassword.setText("");
            }
        });

        generateResult();
    }

    private void generateResult() {
        List<Users> usersList = getFromSQL();
        int size = usersList.size();

        if (size > 0) {
            mResult.clear();

            for (int i = 0; i < size; i++) {
                Users currentItem = usersList.get(i);
                mResult.add (0,currentItem.getId() + ", " + currentItem.getName() + ", " + currentItem.getEmail() + ", " + currentItem.getPassword());
            }

            ((BaseAdapter) mListView.getAdapter()).notifyDataSetChanged();
        }
    }


    //---------------------------------SQL QUERY Functions-----------------------------------------//
    public List<Users> getFromSQL() {
        List<Users> userses = userDao.queryBuilder().orderDesc(UsersDao.Properties.Id).build().list();
        return userses;
    }

    public void SaveToSQL(Users user) {
        userDao.insert(user);
    }
    //----------------------------***END SQL QUERY***---------------------------------------------//


    //-------------------------------DB Setup Functions---------------------------------------------//

    //Return the Configured LogDao Object
    public UsersDao setupDb() {
        DaoMaster.DevOpenHelper masterHelper = new DaoMaster.DevOpenHelper(this, DB_NAME, null); //create database db file if not exist
        SQLiteDatabase db = masterHelper.getWritableDatabase();  //get the created database db file
        DaoMaster master = new DaoMaster(db);//create masterDao
        DaoSession masterSession = master.newSession(); //Creates Session session
        return masterSession.getUsersDao();
    }
    //-------------------------***END DB setup Functions***---------------------------------------//

}
activity_main.xml
<?xml version="1.0" encoding="utf-8"?>
<LinearLayout xmlns:android="http://schemas.android.com/apk/res/android"
    xmlns:tools="http://schemas.android.com/tools"
    android:id="@+id/activity_main"
    android:layout_width="match_parent"
    android:layout_height="match_parent"
    android:orientation="vertical"
    android:paddingBottom="@dimen/activity_vertical_margin"
    android:paddingLeft="@dimen/activity_horizontal_margin"
    android:paddingRight="@dimen/activity_horizontal_margin"
    android:paddingTop="@dimen/activity_vertical_margin"
    tools:context="samples.bm.com.greendaoe1.MainActivity">


    <EditText
        android:id="@+id/et_name"
        android:layout_width="match_parent"
        android:layout_height="wrap_content"
        android:hint="Name" />

    <EditText
        android:id="@+id/et_email"
        android:layout_width="match_parent"
        android:layout_height="wrap_content"
        android:hint="Email" />

    <EditText
        android:id="@+id/et_password"
        android:layout_width="match_parent"
        android:layout_height="wrap_content"
        android:hint="Password" />

    <Button
        android:id="@+id/btn_Save"
        android:layout_width="match_parent"
        android:layout_height="wrap_content"
        android:text="Save" />

    <TextView
        android:layout_width="match_parent"
        android:layout_height="wrap_content"
        android:layout_marginBottom="10dp"

        android:layout_marginTop="20dp"
        android:text="Result"
        android:textStyle="bold" />

    <ListView
        android:id="@+id/lv_result"
        android:layout_width="match_parent"
        android:layout_height="wrap_content" />

</LinearLayout>
Out Put
Note:-
While running you app you need to set app from tine toolbar and run
Ref:


